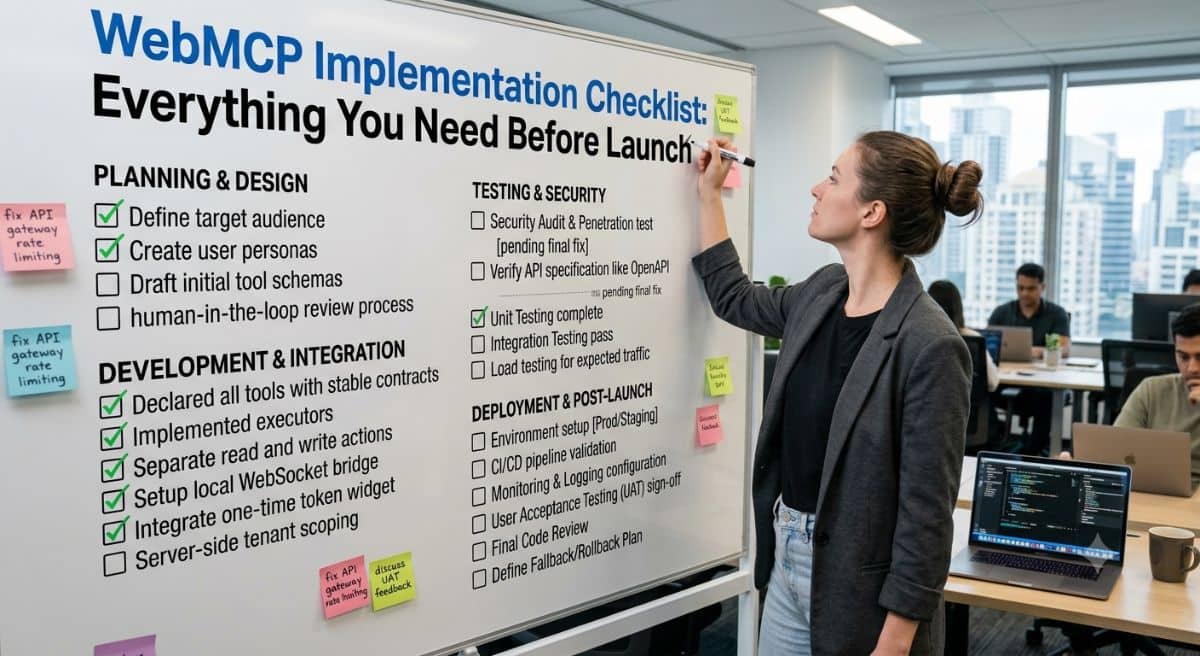
WebMCP Implementation Checklist: Everything You Need Before Launch
AI agents now interact directly with websites. To support these workflows, businesses must prepare their digital infrastructure. WebMCP (Web Model Context Protocol) helps AI systems find tools, execute actions, and retrieve data smoothly.
However, you cannot just activate the protocol and go live. AI agents require clear endpoints, secure authentication, and reliable environments. A single setup mistake can completely block an agent.
This WebMCP implementation checklist ensures your website is fully ready for AI before you launch.
Why a WebMCP Pre-Launch Checklist Matters
We build traditional websites for human visitors. WebMCP adds a new layer, letting AI agents communicate directly with your site’s features.
Before you deploy, confirm that:
- You can access WebMCP endpoints.
- You connect AI providers properly.
- You register tools correctly using the model context protocol.
- Responses follow structured formats.
- Agent workflows execute successfully.
- Monitoring systems capture errors and activity.
A structured validation process prevents failed interactions and ensures your site is ready for real-world AI usage.
Step 1: Set Up Your WebMCP Testing Environment
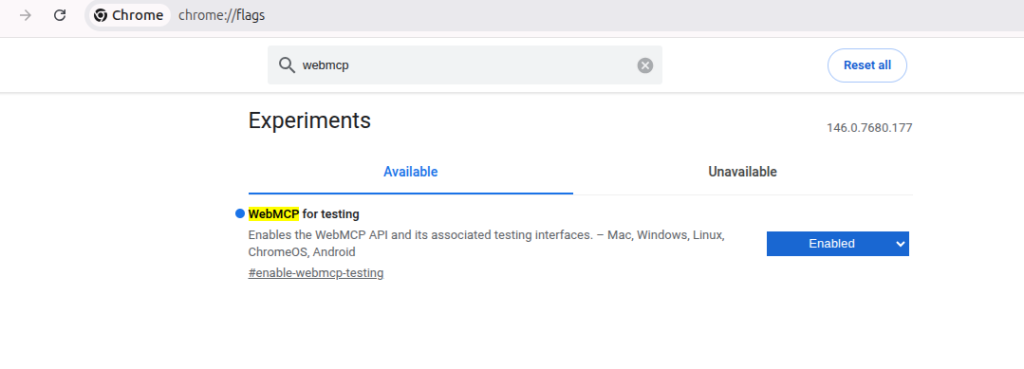
Before testing your implementation, you need a browser that supports WebMCP. Google Chrome includes a built-in developer flag specifically for this purpose. Enable this flag to activate your development environment and start validating your endpoints.
Enable WebMCP Testing in Chrome
WebMCP Early Preview: Since WebMCP is currently in the development phase, Chrome has launched an Early Preview for developers who want to test these features and understand how they will work in the future.
- Open Chrome version: 146.0.7672.0 or higher.
- Type chrome://flags/#enable-webmcp-testing into your address bar and hit enter.
- Search for WebMCP.
- Change the setting to Enabled.
- Restart your browser.
Why This Step Matters
A proper testing environment helps you:
- Verify that your endpoints work.
- Test how AI agents discover your tools.
- Debug any tool registration errors.
- Confirm protocol responses before you launch.
Your Checklist
- Enabled the testing flag
- Restart your browser
- Activated WebMCP functionality
- Prepared your development environment
Step 2: Verify WebMCP Endpoint Accessibility
Your WebMCP endpoint connects AI agents to your website. If agents cannot find this gateway, they cannot access your tools or workflows. Always verify your endpoint to ensure seamless communication and successful agent discovery.
Endpoint Requirements
To launch successfully, your endpoint must meet these four requirements:
- Public discovery: Allow agents to find the endpoint easily.
- Valid responses: Return correct, protocol-compliant data.
- HTTPS security: Use secure, encrypted communication.
- High availability: Maintain consistent uptime.
Common Endpoint Problems to Avoid
When troubleshooting, watch out for these typical setup mistakes:
- Incorrect URLs
- Broken routing rules
- SSL certificate issues
- Wrong authentication settings
Your Checklist
- Reach the endpoint successfully
- Enable HTTPS security
- Confirm the protocol response
- Complete the discovery process
Step 3: Generate and Secure AI Provider Credential
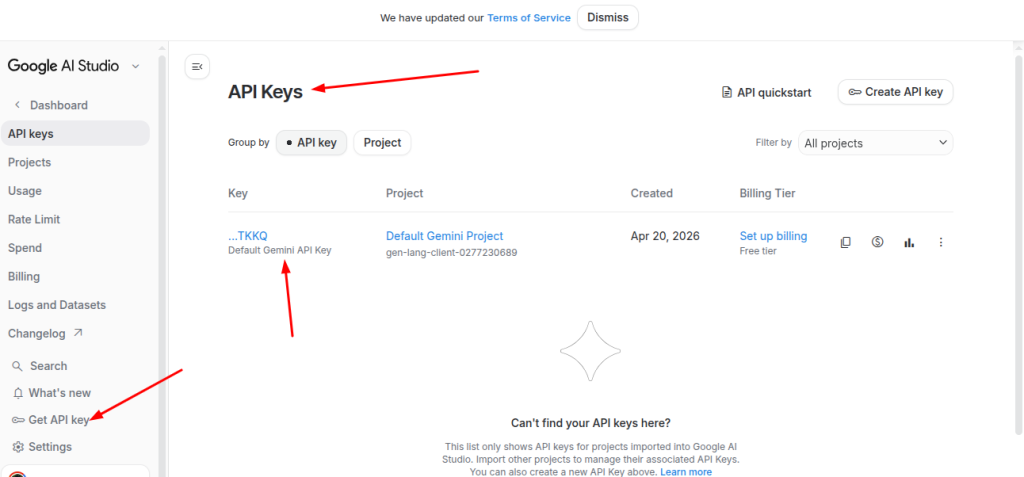
Most WebMCP setups need AI providers like Gemini to process requests and run agent interactions. You must configure valid API credentials before you launch. Google’s latest security updates require you to restrict these keys to specific models. This restriction protects your development environment from unauthorized access and unexpected quota drains.
Creating a Gemini API Key
Google AI Studio lets you generate API keys that connect AI models to your WebMCP workflows. To set this up, log into the AI Studio dashboard, click Create API Key, and select your project. This process links your keys directly to the mcp model context protocol to handle data securely. Always store your generated key in server-side environment variables instead of client-side code to keep it hidden from users.
Why API Keys Matter
Without valid credentials, your system will fail:
- AI agents cannot process user requests.
- Tools fail to execute properly.
- Automated workflows stop working.
- The system cannot generate responses.
Security Best Practices
Protect your project from data leaks and unauthorized costs with these safety rules:
- Store credentials in environment variables: Never hardcode your keys directly into your software.
- Keep keys private: Never upload your keys to public repositories like GitHub.
- Rotate keys regularly: Change your API keys periodically to prevent long-term security leaks.
- Monitor your usage: Check your dashboard metrics frequently to catch unusual traffic early.
Your Checklist
- Create your API key
- Store your credentials securely
- Verify access permissions
- Test end-to-end connectivity
Step 4: Configure AI Providers in WebMCP Inspector
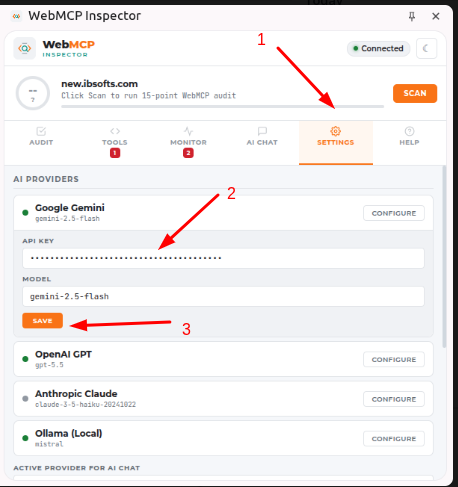
After you generate your API credentials, connect them to your WebMCP environment. The WebMCP Inspector offers an easy interface to manage your AI provider integrations. It provides visibility into the WebMCP tools currently registered on your website.
Configuration Process
Follow these steps to connect your provider:
- Open WebMCP Inspector.
- Navigate to Settings.
- Select your AI provider.
- Enter your API key.
- Choose your preferred AI model.
- Save the configuration.
How to Select the Right Model
Consider these four factors when choosing your AI model:
- Response quality: Match the model’s intelligence to the complexity of your tasks.
- Context length: Ensure the model can handle the amount of text you plan to send.
- Cost efficiency: Balance your budget against your daily usage requirements.
- Processing speed: Choose faster models if your users need instant replies.
Your Checklist
- Select your provider
- Add your API key
- Choose your model
- Save your settings
- Verify the connection
Step 5: Register and Validate WebMCP Tools
Tools are the specific actions AI agents perform through your website. Common examples include:
- Form submissions
- Appointment scheduling
- Product searches
- Flight Booking
- Lead generation workflows
If you register a tool incorrectly, agents cannot discover or execute it.
Tool Registration Best Practices
Follow these guidelines to ensure agents understand your tools:
- Use clear tool names: Create short, action-oriented names.
- Provide detailed descriptions: Explain exactly what the tool does so the AI knows when to use it.
- Define required parameters: Explicitly state which data fields the tool needs to run.
- Validate schema structures: Check your JSON format to prevent syntax errors.
Your Tool Registration Checklist
- Register the tool
- Define all parameters
- Validate the schema structure
- Test the discovery process
Step 6: Test Tool Execution and Monitor System Logs
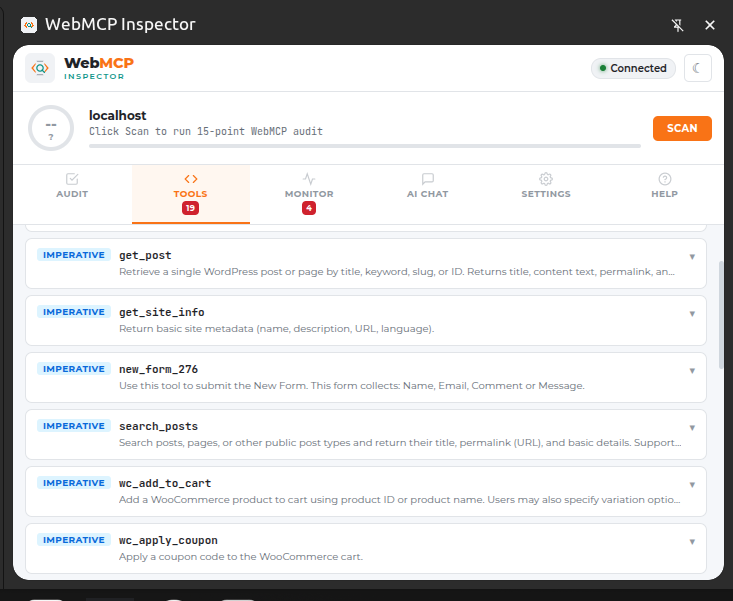
After registration, test every tool to confirm it executes successfully. Monitoring dashboards give you clear visibility into requests, responses, and live execution events.
What to Validate
Confirm that your system achieves the following:
- Agents discover your tools without issues.
- The system processes incoming requests correctly.
- The tool returns successful responses to the agent.
- Your logs accurately capture all execution activity.
Why Logs Matter
System logs help you quickly find and fix these four common errors:
- Failed network requests
- Invalid or missing parameters
- Authentication and permission errors
- Internal tool execution issues
Your Execution Validation Checklist
- Discover the tool successfully
- Process the incoming request
- Generate the correct response
- Record the activity in your logs
- Review and clear all errors
Technical Validation Before Launch
To validate your implementation, use structured data formats to ensure reliable communication. This API endpoint, used by the WebMCP Inspector chrome extension, returns a response allowing developers to verify successful tool registration on the website. A successful response confirms the registration is working correctly and that the extension can discover the tools.
Example Tool Schema
Use a structured JSON schema to define how your tool retrieves and interacts with posts on your website.
{
    "name": "get_post",
    "public": true,
    "description": "Retrieve a single WordPress post or page by title, keyword, slug, or ID. Returns title, content text, permalink, and metadata.",
    "capability": "read",
    "inputSchema": {
      "type": "object",
      "properties": {
        "query": {
          "type": "string",
          "description": "Post or page title, keyword, or search text."
        },
        "slug": {
          "type": "string",
          "description": "Post or page slug."
        },
        "id": {
          "type": "integer",
          "description": "WordPress post ID."
        }
      },
      "additionalProperties": false
    },
    "group": "content"
  },
Example Success Response
AI agents rely on predictable outputs to understand the result of an action. Use this clean format to confirm successful tasks:
{
  "success": true,
  "data": {
    "id": 511,
    "title": "WebMCP Blog",
    "slug": "webmcp-blog",
    "content_text": "",
    "link": "http://example.com/webmcp-blog/",
    "date": "June 25, 2026",
    "post_type": "post"
  }
}
Example Error Response
Structured error handling helps agents determine the next step when something goes wrong. Clearly state what caused the issue:
{
   "success":false,
   "error":"Please provide id, slug, or query."
}
Common WebMCP Implementation Mistakes
Many deployment issues stem from a few recurring problems. Avoid these critical mistakes to improve your launch readiness and boost your long-term system reliability.
1. Skipping Endpoint Validation
An inaccessible endpoint blocks AI discovery and stops tool execution completely. Always test your endpoint visibility before moving forward.
2. Misconfiguring AI Providers
Invalid API credentials stop your automated workflows instantly. Double-check your access keys inside your project dashboard to keep your systems running.
3. Poor Tool Schema Design
Missing parameters and vague descriptions confuse AI agents and cause execution failures. When you implement the mcp model context protocol ai integrations, write precise schemas so your agents understand exactly how to use each tool.
4. Ignoring System Monitoring
If you do not track your logs, you will struggle to diagnose and fix errors after you launch. Real-time logging gives you the visibility you need to troubleshoot bugs fast.
5. Sending Inconsistent Response Structures
AI agents require predictable data formats to interpret results accurately. Standardize your success and error payloads to ensure your agents can always determine their next step.
Final WebMCP Launch Checklist
Before deployment, verify the following:
| Validation Item | Status |
|---|---|
| Testing Environment Ready | ✓ |
| Endpoint Accessible | ✓ |
| AI Credentials Configured | ✓ |
| Provider Connected | ✓ |
| Tools Registered | ✓ |
| Tool Execution Tested | ✓ |
| Structured Responses Verified | ✓ |
| Error Handling Implemented | ✓ |
| Monitoring Enabled | ✓ |
FAQs
A WebMCP checklist ensures you properly configure, test, and prepare your website for smooth AI agent interactions before your public launch.
Endpoint validation guarantees that AI agents can find and talk to your WebMCP server without facing any connection or setup errors.
Yes. Most WebMCP setups require an AI provider API key to handle agent communication and run your automated workflows.
You should test your endpoint access, tool registration, AI provider connections, response formats, security settings, and live tool workflows.
Use developer testing tools and live system logs to confirm that your system successfully discovers tools, processes requests, generates responses, and handles errors.
Launch Your WebMCP Implementation with Confidence
As AI agents transform how users find information, your website must support direct machine interactions. WebMCP provides this foundation. By completing this pre-launch checklist, you reduce deployment risks, maximize agent compatibility, and ensure a secure, reliable, and agent-friendly digital experience for the next generation of AI interactions.
Make Your Website AI-Agent Ready
Need help validating your WebMCP setup? Partner with WebMCPWorld to audit, optimize, and launch a WebMCP implementation built for seamless AI agent interactions.